the wheel


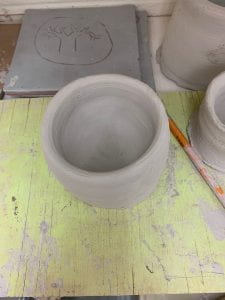
When I started the wheel I expected to do a lot worse than just making things with regular clay. In the beginning I had a lot of fun with it but I couldn’t keep the speed under control and couldn’t handle the clay. I asked Olivia for help and she told me about her technique, I was able to make the clay more centered and secured when I used her advice. As I continued I was more able to center it but not able to make a cylinder. Making the shape of it and making it taller was very difficult for me because I could not seem to make the walls even and strong they would break. After a couple days of trying and failing I asked Ms A for help and she showed me that I should rest my elbows on my knees and have complete control over the clay. I was able to use her technique when making it taller as well. I used one finger to lift and the other inside, I did very well with this. Immediately after she gave me advice I made a successful cylinder. I didn’t make as many as I wanted too because I seemed to forget the technique when the weekend came but when I got back to school I  started to be able to do that and I wanted to make my teapot on the wheel but decided not too.

Teapot blog post

Planning

For my tea pot project I am doing a Beauty and the Beast theme. I started with my sketches and I tried to make them as detailed as possible. I did this because I don’t want to think about my designs while I am in the middle of making my work. I am worried I wont be able to do my designs on on my tea cups because they are applique and I have never done that before. I planned on my tea pot to be a circle and stand up on legs but I am not sure how to balance it. My plan was to do 2 legs but I’m not sure if that will be enough strength to support the tea pot.

Process

When I began my project I was doing the tea pot first but I had many failed attempts at making it stand up right. I tried to build it on two legs and it didn’t work, they weren’t even. Then I tried four legs and they still were not even. I gave up on my tea pot for now and started working on the tea cups. At first I was doing a coil cup but it would take to much time so I made both of the cups out of slabs. I am still struggling to find a way to balance my tea pot.

Blog post #4

embers bowl (used as comparison)

artists collaborate /community

During my work I struggled making my coils even. I asked Olivia for help with this and she helped me even them out with the edge scraper. She also taught me how to make the walls of the bowl thicker and stronger. I have always had that issue when making my bowls but now I have a way to solve it. To make the walls thicker I made a small cut in the wall and joined them together. I also helped Olivia roll her coils because she struggles with them getting hollow.


artists take risks

I tried using thinner coils and different tools while making my bowl. I plan on doing a design with my glaze which I have never done before. I also want to use two different colors one on the outside and a different one on the inside. While I was making my bowl I didnt think it was going to come out the way I wanted to but I did a really good job on trying to make it smooth and I took more time on it.

Blog post 3

Artists develop art making skills

I learned how to pinch the bottom and create a new base design that gives it a more advanced look. I also learned how to use the under glaze and do scrafito. I did scrafito on my mug and did a beach design. I did a pinkish glaze and dark blue on the inside.  I used the rubber rib and some slip for the handle. I struggled most with attaching the handle but using the slip helped make the connection.

Artists solve problems

When I started the scrafito I messed up my design a little bit so I had to paint over and redo it and add more details. I am happy with the results of my design because the outline of it is very clean. Another one of my troubles was the handle, I was going to do a twisted handle to make it more advanced but my handle kept cracking so I just did a basic handle and used slip to make the connection. I had a hard time doing the glaze on the inside and getting good coverage. I decided to solve this problem by getting a smaller brush to paint the bottom.

Blog post 2

    • A certain artist can make their artwork meaningful by adding specific details. They can make their art work mean something and have a story behind it. The color, technique, and details mean a lot in artwork.

When I was building my tripod I had a bit of a rough time with the 3 legs but I learned how to squeeze the clay and make all of the legs of the mug even. I had to restart once because my legs were uneven but I fixed it when I tried the second time. If I could do it differently I would take a little more time when making the legs of the mug because I rushed through it a little bit and could of possibly made it better.

When doing my sgraffitto I had to paint over several layers, I would wait for it to dry and then reply so I had a smooth, thick, even layer. In some spots grey parts of my mug would show so I would have to go over them again to make sure you could not see any grey area. If I could do something differently I would have used the banding wheel from the start so I would have gotten a more even coverage.

If you have persistence when making your artwork it will be a lot more skilled. Improving your artwork and adding details takes time and patience. If you keep working and adding the details you wanted then it will come out perfect, you can’t give up on it at the end.

Blog Post 1

my lock
serrated edge scraper ( one of the tools i used)
slip (another tool i used)

                                             Observation

For my Trompe L’oeil project I did my lock from my locker. To measure it I made a slab and then placed my lock on top and cut around it so they would be the same size. I made the part of the lock where the numbers are a little bigger than normal so it would be easier to read the numbers. I paid most attention to the knob and number part, I focused on the knob and I put my enitials on it to make it more personal.

                                           Develop Craft

The tools I used were paddle, wet sponge, slip, serrated edge scraper, and the needle tool. I used the paddle to get the base of the lock a good shape and to make it flat. To add on my handle I used slip and a serrated edge scraper, I scored both sides and added a little slip to make the connection strong. Before I drew on my numbers I used my wet sponge to make everything smooth and then I used the needle tool to make my numbers and marks very precise. My process of my lock was first a slab that I cut into a thick circle and then made a very thing slab to cut out another circle that goes on top of the lock. then made a small circle and paddled it and made the knob. For the handle all I did was a small coil and joined it to the lock. Then I just went back in with my needle tool and added the details.

                                          Problem solving

Carving in the numbers and tick marks was the hardest part because they are very small and took a lot of detail. I just took my time and precisely did them. It took me a couple of try to get my handle on because it would keep cracking so I added some water to it to make it easier to bend.

Final Blog post

Glazed pinch pot
glazed tea pot, final project

Glazed mug #1 (other one is lost)

Glazed mug

Glazed coil bowl
Soap dish
Nesting forms
Vase
Idiom project


                                   Improvement

When I first started making my pinch pot I had a very difficult time, I struggled on making the correct form and making it smooth. As I reflect on this it makes me realize that I was doing the correct technique but not using the right tools. I should have been using the rubber rib to smooth out the sides and use a little bit of water to make it easier. While making my coil bowl I had made a lot of improvement. I used a small wet sponge to make the surface a little wet and smooth the sides, a rubber rib to get out the cracks and help the form, and a serrated edge scraper to make my coils have a strong connection. I observed how many changes this made and how much smoother and cleaner the bowl looked. My soap dish was my first time using slabs was while I was making my soap dish, it started out very cracked but I used the tools that I had previously used on my coil bowl and it came out smooth when it was bone dry (do not have a picture of it finished only in progress).  When I started making my idiom project it was my first time making a unique shape other than a bowl or slap building. I struggled making the pea pod but I had finally got it after several tries. Making hollow peas was another struggle for me but I understood after a little help, my skills started improving a lot and I became more able to create something that looked good. Making my first mug was a little hard because it was a new way of building something but it came out decent. Using a template really helped me but it ended up still coming out a little cracked in some places because of the small spaces but overall I think I did pretty good for my first mug, I used the mermaid texture on it and that helped making the cracks look less noticeable.


                       If I could redo one

If I could restart any project it would be my vase. My vase was the project I was most excited for and I was not happy with how the form came out. It came out looking tilted even after using the paddle while building, if I could go back I would take more time on it and pay more attention to the little things as I was building so I could prevent it from coming out messed up again. I would try and make a better template for my vase because I ended up not using mine as much as I should have. I should have used my time more wisely and gave myself enough time to make a better form.


Blog post 10

                                     Rolling Slabs

When I first started rolling my slabs they came out really thin and had a lot of cracks but I started rolling them differently and they came out better. It took me a couple of tries but then they came out really good. I used the wet sponge, roller, and the rubber rib and they came out really smooth. I had to form them into a mug really slow so the slab wouldn’t crack, it joined really good and looked smooth all around.

                                           Textures 

I used the mermaid roller and on the first one a lot of the textures overlapped each other but on my second mug and it came out better and even.  For the colors I’m going to use purple, blue, and pink to make it look like under the sea colors and I am going to make it glossy.


                                Mugs

I am making my mugs for my mom I am going to make them colorful because she likes that. I made it  look like a mermaid tail because she likes the ocean. She drinks coffee every morning and she drinks tea at night. She will know I made it special for her because of the textures and colors, I am using her favorite colors. 

My first mug cake out cracked.

This is cali’s mug I want to do a mug with a similar design.


I want to do a mug this color because orange is my brothers favorite color.

Blog Post 9

Artists organize and develop artistic Ideas

When I was researching the Greek vessels I noticed how they were all different and unique. When I started sketching my vases I wanted all of them to be unique shapes. I wanted my vase to be very wide at the bottom and then get skinnier as it gets taller. I determined the width of my base because I didn’t want it to be to wide so I decided to make it around 10cm wide. The challenges I have faced is making my base start to curve inward. It ens up going straight up and I have been bending it to make it skinnier.


Artists develop and refine their artmaking techniques

I am using the coil bowl technique and trying to make the coils shorter as the bowl gets taller. My goal is to make the base of the vase look like a smooth bowl and then get skinnier. So far my vase is going pretty good it is just a little thin so I have to work on making it thicker and stronger. I will use a wet sponger and a rubber rib to smooth it out and then use a serrated edge scraper to join the clay and make it thicker.